You don’t need to be a tech expert to sell online.
Here is a 6-step guide that will walk you through everything you need to get started.
Are you planning to start a small online store, or are you already starting it?
This article will give you step-by-step instructions on how to start your online store.
This article will show you how to start an online shop. It will cover everything you need to know to start an online store that will generate sales from around the world.
Picking your niche is the first step. A niche is a specific segment of a larger market.
I’ll break it down for you. When choosing your niche, you have to decide:
- What do you want to sell?
- Who are you going to sell it to?
- Why would they buy it?
The three questions are far from an obvious answer.
Doing your perfect customer base and figuring out why they would buy from you will make your job much easier.
People often jump into the bigger market and hope to get good sales. This is not correct.
If your target audience is only “people who breathe,” then you will struggle to explain the product in the market.
Choosing one niche is better than all over it.
Start with an area in which you already have an interest and knowledge. Working in a field, you don’t know anything about is complicated.
Start with your interests, and navigate from there. Make sure to find your ideal customer and what makes them buy the products you offer.
It would be best to start by looking at what the competition is doing in the niche.
See how they position their products and customers. Learning from other people’s experiences will be beneficial.
How to Start an Online Shop in Less than 1 Hour.
You need the following essential things to start and build your online store.
Domain Name.
In short, a domain name is the address of your business, an Online Store, and a personal website.
The most common examples are www.google.com or www.twitter.com. Your company’s name and its products and services can all be expressed as web addresses.
Before you decide what to call your business, you must consider a few things.
You want to have a name that is memorable, easy to spell, easy to pronounce, and short but still conveys the full meaning of the words you choose.
You should also consider whether your domain name will fit with your branding.
If you’re interested in getting your own domain name, check out NameCheap here.
Hosting for your Online Store.
A web hosting service is a type of internet service that hosts websites for their customers/clients.
A web hosting service company offers various facilities to their clients to create, run, maintain, and access their client’s sites on the World Wide Web.
Companies that provide web hosting services are also known as web hosts.
In a nutshell, hosting is the process of renting or buying virtual space to house a website on the World Wide Web.
A website contains various content, such as HTML, images, CSS, and content, and to view it online, you need server space.
There are Different Types of Web Hosting.
- Shared Hosting.
- Virtual Private Server (VPS) Hosting.
- Cloud Hosting.
- Dedicated Hosting.
- Managed Hosting.
- WordPress Hosting.
- Reseller Hosting.
Now you have the domain name for your online store, it’s time to find the best web hosting provider.
When it comes to picking the best hosting provider and the hosting you need, you’ll need to consider what kind of store you will build.
One thing I will say here is to skip shared hosting. When you share a server with other websites, and if any of them gets hacked or run into any problem, your store is left vulnerable too.
Hostinger is our top-rated hosting provider for your online store. Hostinger is a solid hosting provider with an affordable pricing plan.
Install WordPress.
WordPress Content Management System is open-source software that allows you to manage and publish content on your website.
WordPress is completely free, and you can quickly master its features.
There are two main ways to install WordPress:
- ‘One-click’ install through your hosting dashboard.
- Manually download WordPress, then upload it to your hosting account.
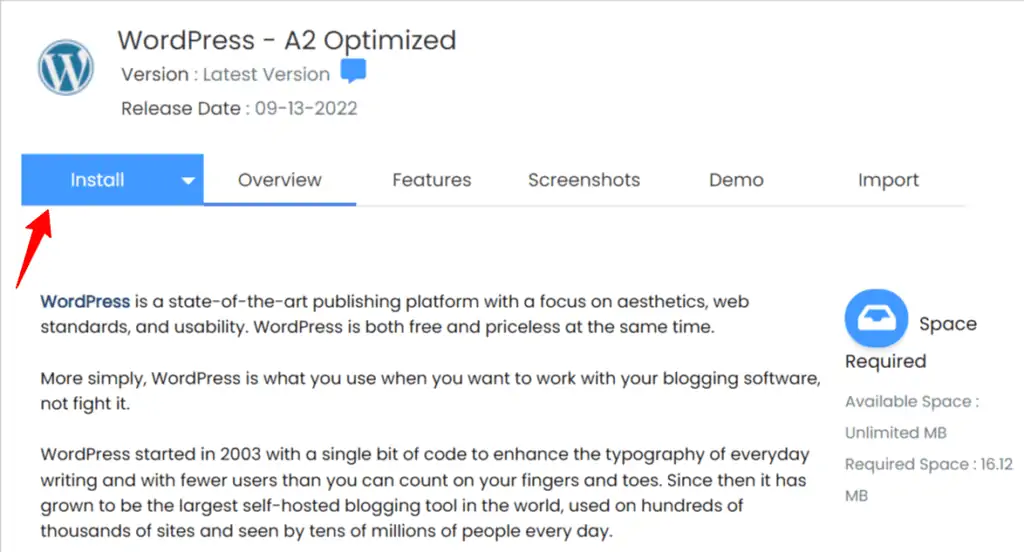
‘One-click’ WordPress installation.
One Click installation is the easiest option, and we also recommend it.
When you pick a hosting provider, they offer you the option to install WordPress in just one click.
To install, head over to your hosting dashboard and look for a button that says “Install WordPress.”
Manual WordPress installation.
Although almost all hosting providers offer one-click WordPress Installation, if your hosting provider does not provide that option, you have to download WordPress to your computer and then upload it to your hosting account.
Check out this WordPress guide on installing the software yourself.
Install WordPress Theme (We Recommend Astra Theme)
A Theme is a collection of files (graphics, style sheets, and HTML code) that dictate your website’s overall appearance.
Your WordPress theme helps you design all the content of your website. The best thing about WordPress is that you can easily customize your entire website.
A theme is essential to your website, so choose the best WordPress theme. We recommend Astra Theme, one of the fastest and most lightweight themes.
You can easily install any theme from your WordPress dashboard in the theme directory. Follow the below tips to install Astra Theme on your website.
- Log in to your WordPress dashboard.
- Hover over ‘Appearance,’ then click ‘Themes.’ This will take you through to the theme dashboard.
- Click the button above the theme that says ‘Add New, then search for Astra Theme.
- Then hit ‘Install’ under the theme to download it.
- After a couple of minutes, a button will appear under the theme ‘Activate.’ Click on that button, and you have successfully installed the Astra theme on your site.
To install a premium theme on your website.
- Download the .zip file of your new theme.
- Log in to your WordPress Dashboard.
- Hover over ‘Appearance,’ then click ‘Themes.’ This will take you through to the theme dashboard.
- Click the button above the theme that says ‘Add New.’ This will take you to the WordPress theme dashboard.
- Click the blue button at the top that says ‘Upload Theme.
- You’ll then be prompted to choose a zip file from your computer. Choose your new theme file.
- You’ll then see a success message with a link to activate your theme. And that’s it, and you’re ready to go!
Install WooCommerce in your store.
WooCommerce is a free eCommerce plugin for WordPress. It is specifically created for small to large-sized online merchants using WordPress.
Since its launch in 2011, WooCommerce has been the most popular WordPress plugin for eCommerce businesses.
It has an excellent rating of 4.6/5 from approx. 3000 users and has been installed by more than 4 million people on their websites.
There are two methods you can create a WooCommerce store:
1. Using any one of the Astra Starter Templates
2. From Scratch: Use this guide if you want to create it from scratch.
The plugin is very easy to use, which is why it is so popular in less time. Although free, you may have to pay for some ‘extensions that include
- Product pages
- Cart and checkout
- Secure payments
- Shipping options and label printing
- Automated tax calculations
- Integration with Google Analytics, Facebook, MailChimp, etc.
Setting up your online store
Let’s learn how to install and activate WooCommerce in your store.
Step 1. Install WooCommerce:
Log in to your WordPress dashboard, and head to the plugin directory by clicking ‘Plugin’ on the left-hand menu:
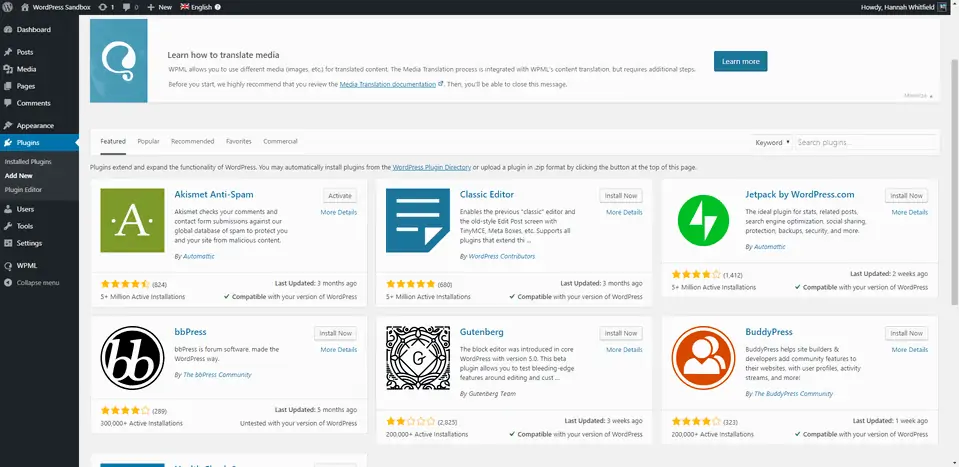
Here, search for ‘WooCommerce’ in the search bar, then click the grey ‘Install Now’ button.
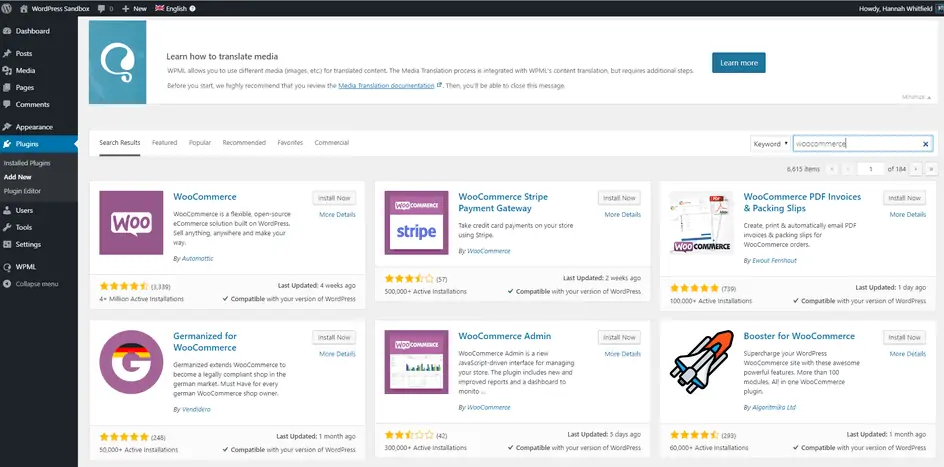
After a few seconds, this button will turn to a blue one that says ‘Activate’. Click on this.
Here is WooCommerce’s helpful setup wizard to walk you through the rest of the setup process.
Step 2. Add business details
First, you’ll need to fill out your business details, which are pretty self-explanatory:
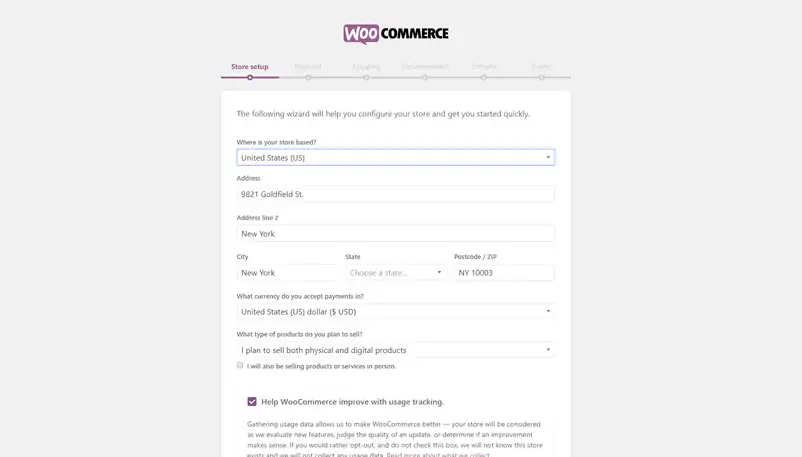
Make sure to choose the right option if you want to sell both physical and digital products.
Good to know: Digital products are typically downloadable, such as ebooks, online courses, email templates, Canva templates, WordPress themes, stock photos, etc. Digital cameras and laptops, however, would be a physical products.
Step 3. Select payment options
The third step is to choose the payment methods you’ll accept through your store for the products you are selling.
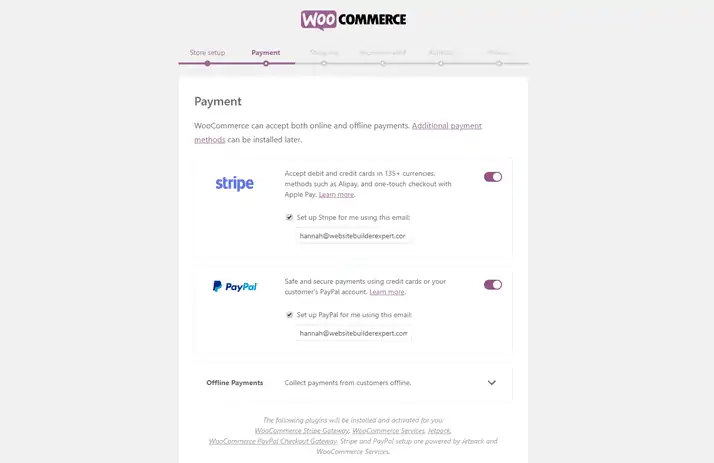
Stripe and PayPal are popular options. I would recommend you enable both. You can also set up other payment options as per the availability in your country.
Step 4. Confirm shipping options
The next option is to choose your shipping rates. WooCommerce automatically recognizes the area you are currently in and sets that as your main shipping area/zone.
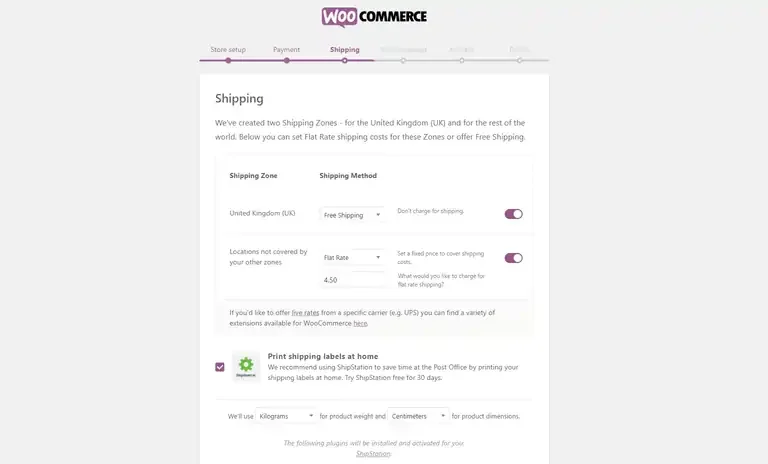
You have the flexibility to either set a fixed price for each zone, set it as free, or integrate with a shipping partner.
Step 5 Add products
Once you have set up everything, in the last stage of your WooCommerce configuration, you’ll see a screen asking you to add your products.
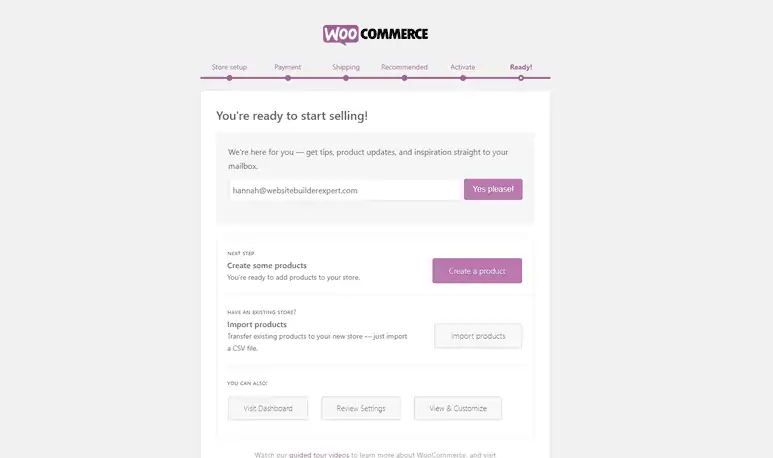
If you don’t want to upload it right now, that’s fine. Whenever you need to add a new product, simply return to your dashboard and click on Add New’.
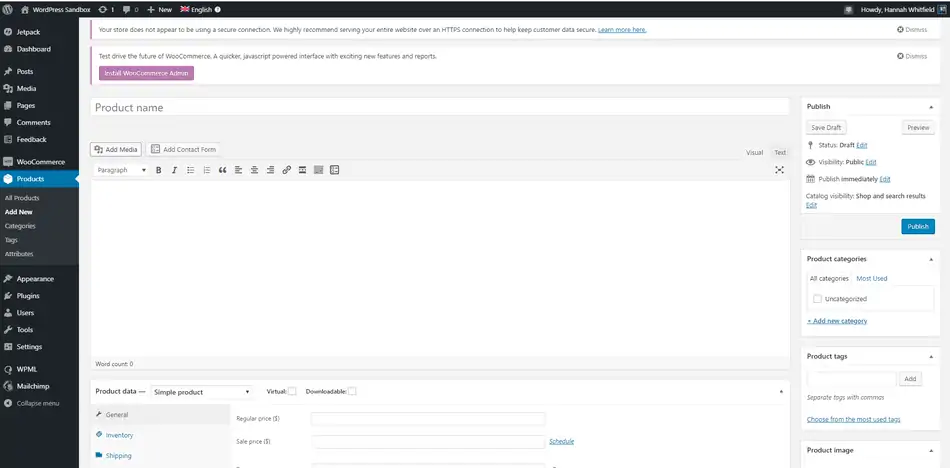
For every product you list in your store, you’ll need the following things:
- Product name –
- Price – e.g., $12.95
- Main product image –
- Additional product images (optional but recommended)
- Product Description (long)
- Short product description
- Product category
Test your store and make your site public
Once you have done everything, remember to test your store, preview the pages and see how it looks.
If you think everything looks good, then make your website/store live.
Install other complementary plugins/themes.
Next, you can install other recommended plugins to take your store to the next level.
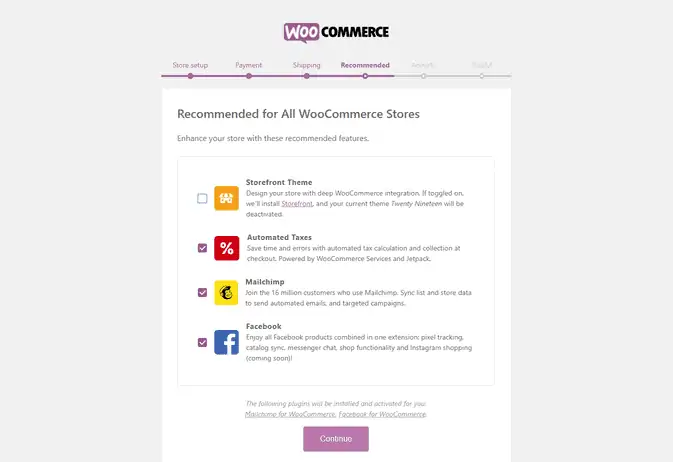
You can install many plugins and themes on your sites, such as Automated tax, Mailchimp for email marketing, and Facebook. If you don’t want them right now, deselect them.
Here are two plugins that you must install on your store.
What if you have created the best online store in the world, but nobody can fit it?
That’s when the Rank Math SEO plugin comes into play. The Rank Math SEO plugin helps you to get into the search engine rankings.
SEO stands for search engine optimization. It’s all about making minor tweaks and changes to your site to help the search engine understand your website’s content better and prioritize it for the SERP.
Security Plugins
When it comes to online businesses, security is one of the essential things, especially when you are accepting payments on your sites. Then the security of your website is at a higher stake.
While there are a lot of free security plugins available, I’d recommend you spend a few extra bucks on paid plugins so that you do not worry about your website’s security.
Here are 3 Security plugins that I recommend you install on your online store.
Key Features:
- Performs an in-depth scan of your WordPress installation to locate errors in your files and directories.
- Offers security activity monitoring.
- Scans websites for malware.
- Information about security issues.
2. Wordfence
Key Features:
- The Web Application Firewall (WAF) comes with it.
- Scans your website for malware, back doors, and so on.
- Checks the site’s core files for security vulnerabilities.
- Allows you to block users.
Key Features:
- Advanced user account and registration security features are included.
- Adds firewall protection to your website.
- Allows you to create backups automatically.
- They send alerts when security problems occur.
Market Your Online Shop
There are various ways to promote your online store, and the below methods are widely used and are well-known for higher conversions.
- SEO
- Content marketing
- Email marketing
- PPC advertising
- Social media marketing
Conclusion How to Start an Online Store
Congrats! If you followed our guide, you should now know how to start an online store.
Easy, right?
Here’s a quick overview of the six steps of creating an online store:
- Choose a Domain name
- Pick a Reliable web hosting provider
- Install WordPress
- Install WooCommerce
- Set up your store
- Market Your shop

Ready To Make Money Affiliate Marketing
Learn These 7 Pillars of Affiliate Marketing I’ve Used To Create A Hyper-Profitable Affiliate Business From Scratch So You Can Make Your First Commission Online…



![What is a Sales Funnel Marketing? [Comprehensive Guide] 13 What is a sales funnel](https://bloggingask.b-cdn.net/wp-content/uploads/2021/09/What-is-a-sales-funnel-768x402.webp)
![The Ultimate Guide To Jasper AI Pricing and Plans in [year] 15 Jasper Ai Pricing Plans](https://bloggingask.b-cdn.net/wp-content/uploads/2022/01/Jasper-Ai-Pricing-Plans-768x415.webp)

![100+ Best AppSumo Deals for [month] [year] [Offers Ending Soon] 17 Best Appsumo Deals](https://bloggingask.b-cdn.net/wp-content/uploads/2021/12/Best-Appsumo-Deals--768x402.webp)